
If you are interested in creating dynamic video content, it's important to know the phases and steps of production. This article takes you through the video production process. First, planning and pre-production. This includes crafting the creative brief, writing the script, finding locations, cast and crew. In production, you get it on camera and then move to the editorial post-production process and distribution of your final product.
What is Video Production? The Video Production Definition
Looking for the video production definition? Let the structure of narrative storytelling be your guide. Just as a story has a beginning, middle and end, so does the process of creating video content from idea generation and planning to execution and distribution.
The Basic Video Production Process: 5 Phases of Production in Detail
The video production process consists of five phases of production. Development and pre-production, followed by production, post-production and finally distribution and marketing. All these steps contribute to defining video production as simply the structure, organization, execution, distribution, and marketing involved with creating a video.
1. Development
Development is pre-planning. It is an essential part of the pre-production process. Whereas a narrative film production will start with developing or purchasing a script, a commercial or corporate video production often begins with identifying the marketing goal. Are you making the video for narrative entertainment, product branding and awareness or influence? Are you launching a content channel or is it a stand-alone project? Is this video part of a larger strategic campaign or is it singularly targeted? During development, it’s helpful to step into the role of creative sleuth and figure out the who, what, where, why, when, and how of your video production.
-
Who is your target audience? Once you determine who you are trying to reach with the content, you can tailor the look, feel and tone to appeal to them (micro short, interview style, vlog, animation, motion graphics, etc.).
-
How will you reach them and on what platform? TikTok, Discord, YouTube, Instagram stories and Reels, Facebook Watch are all ways to distribute your video. Think about screen size as well (mobile devices, desktops, screen mirror to TV).
-
Who will produce the basic video production? In-house producers or hired talent and/or production company? And will it require any speciality skills? (aerial shots? Underwater? VR?)
-
Why is a video the best option? Would a social audio platform like Clubhouse or Spotify for example be a better use of resources?
-
What is your campaign strategy and how will this video support it? Is the goal to entertain, educate or inspire?
-
Timeline, budget and content considerations? Duration of video, production schedule and video production cost breakdown based on content needs such as script development, on screen talent, visual assets, any special effects, location costs, music license fees, crew costs, video rendering and compression, equipment rental and production insurance.
-
Most importantly, after understanding your target audience, your ultimate goal with the video and budget considerations, what story are you telling with the video? What message are you hoping to leave the viewer with and how do you want them to feel? How will you measure if you’ve been successful?
You’ve taken the production step of developing your video concept based on solid research and a firm understanding of your target audience. Now it’s time to prepare all the elements required to go into full-fledged production for your video project. Just as you wouldn’t dream of building a home without a solid foundation, you can’t begin production without a blueprint. In storytelling, this means an outline or brief, a script and a storyboard, which is a visual representation of everything that will be captured in your final video.
Use this professional video production workflow template and helpful diagram to customize the planning and execution of your next video project.
Get Template
Creating the Video Production Brief
If you’ve done the hard work in development, the creative brief should be a breeze. It’s basically taking everything you’ve identified as important for your strategy, be it corporate video, narrative entertainment or video marketing and distilling it down into actionable goals.
-
Identify your core audience: Demographic, psychographic and influences.
-
Describe the goal of the video: Increase sales? Brand awareness? Entertain?
-
Define the video’s core message: AT&T doesn’t sell phones, it connects you to the world around you. Nike doesn’t sell shoes, it sells empowerment with “just do it”.
-
Identify Video Type: Is this going to be a training video, testimonial, branding, educational, product explainer, narrative entertainment, etc.?
-
Distribution plan: This can determine how the video will need to be rendered. Different media platforms have different specs.
-
Set a deadline and a budget: This will often depend on the type of video you are doing and the overall marketing strategy. What is the creative agenda for the stakeholders? Do you have a product line dropping at a certain date and the video producer needs this to be published at launch? Is the video a simple interview with one person or will it require several locations, b-roll footage, actors, costumes and special effects? Line item your budget, prepare for a contingency and know your deadline.
After you’ve created the brief, it’s time to move on to writing the script. If you are writing it yourself, the brief is a great reminder of your original goals for the type of content you desire. If you are handing it off to a production company or freelance writer, it’s a roadmap to make sure everyone is on the same page about the intention of the video.
Writing the Video Production Script
Great, you know your brand, your key demographic, the kind of video you want to make and what you want to accomplish with it. You’ve figured out the budget and the timeline and now time to roll! Not so fast. You can’t wing something this costly and time consuming. You must write the script. Not an outline. The actual script detailed and specific. So, what does that kind of content creation mean? You tell me. If it's a testimonial or interview, write out the interview questions. If it’s a narrative story, write the short script including locations, descriptive action, character, and dialogue. Write all the visual and audio elements that make up the video strategy. It shouldn’t be complicated, but it should be thorough and definitive. It will probably take many revisions to get the script where everyone on the video production team is happy.
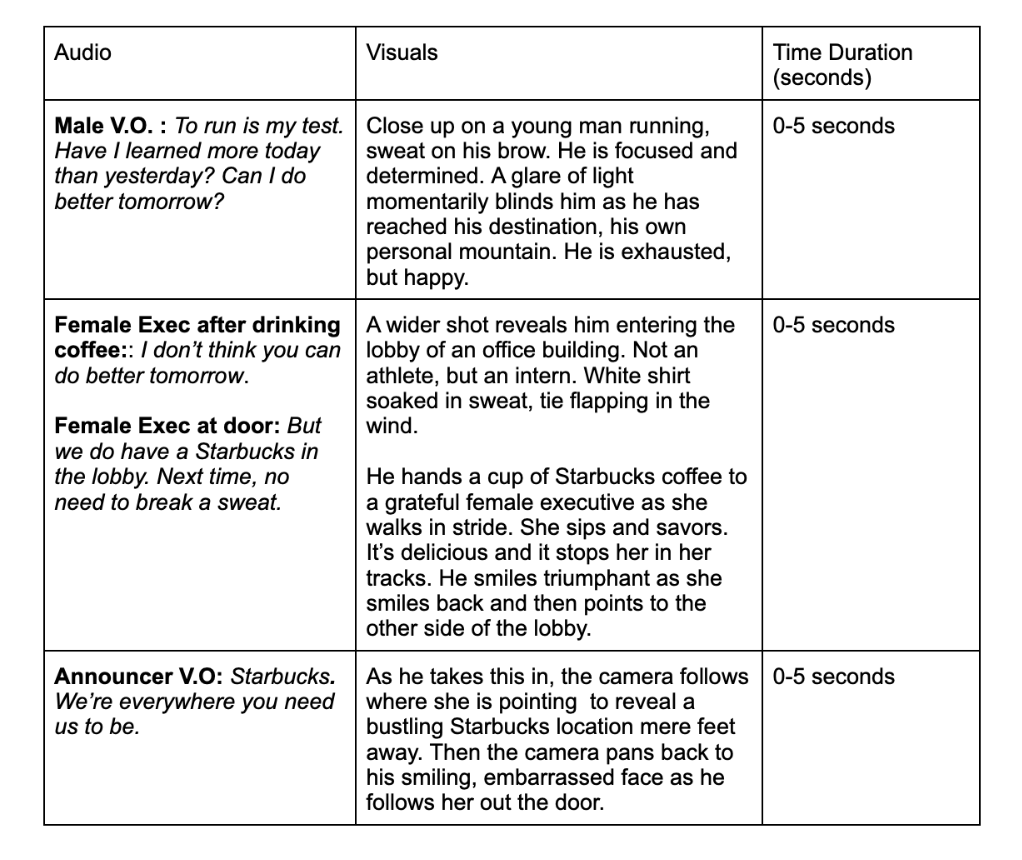
Here is a basic script example for a 15 second video:
What did you notice can be accomplished in 15 seconds of screen time?
-
One Main Message: Starbucks is convenient and delicious.
-
Three Act Structure: The video had a beginning, middle and end.
-
Creative approach: It started out like an inspirational Nike ad and then changed course offering an element of surprise and desire to see how it ends.
-
Character and Relationships: A relatable person and a relatable situation with natural, conversational dialogue.
-
Emotional intent: Lighthearted and humorous.
2. Pre-Production
The script is written, approved and now it's time to prepare for production. Storyboards are drawn for each shot and the director creates a shot list. Locations are scouted and secured and talent auditioned and cast. If not doing this in-house, a production company or individual crew is hired and any needed equipment rented.
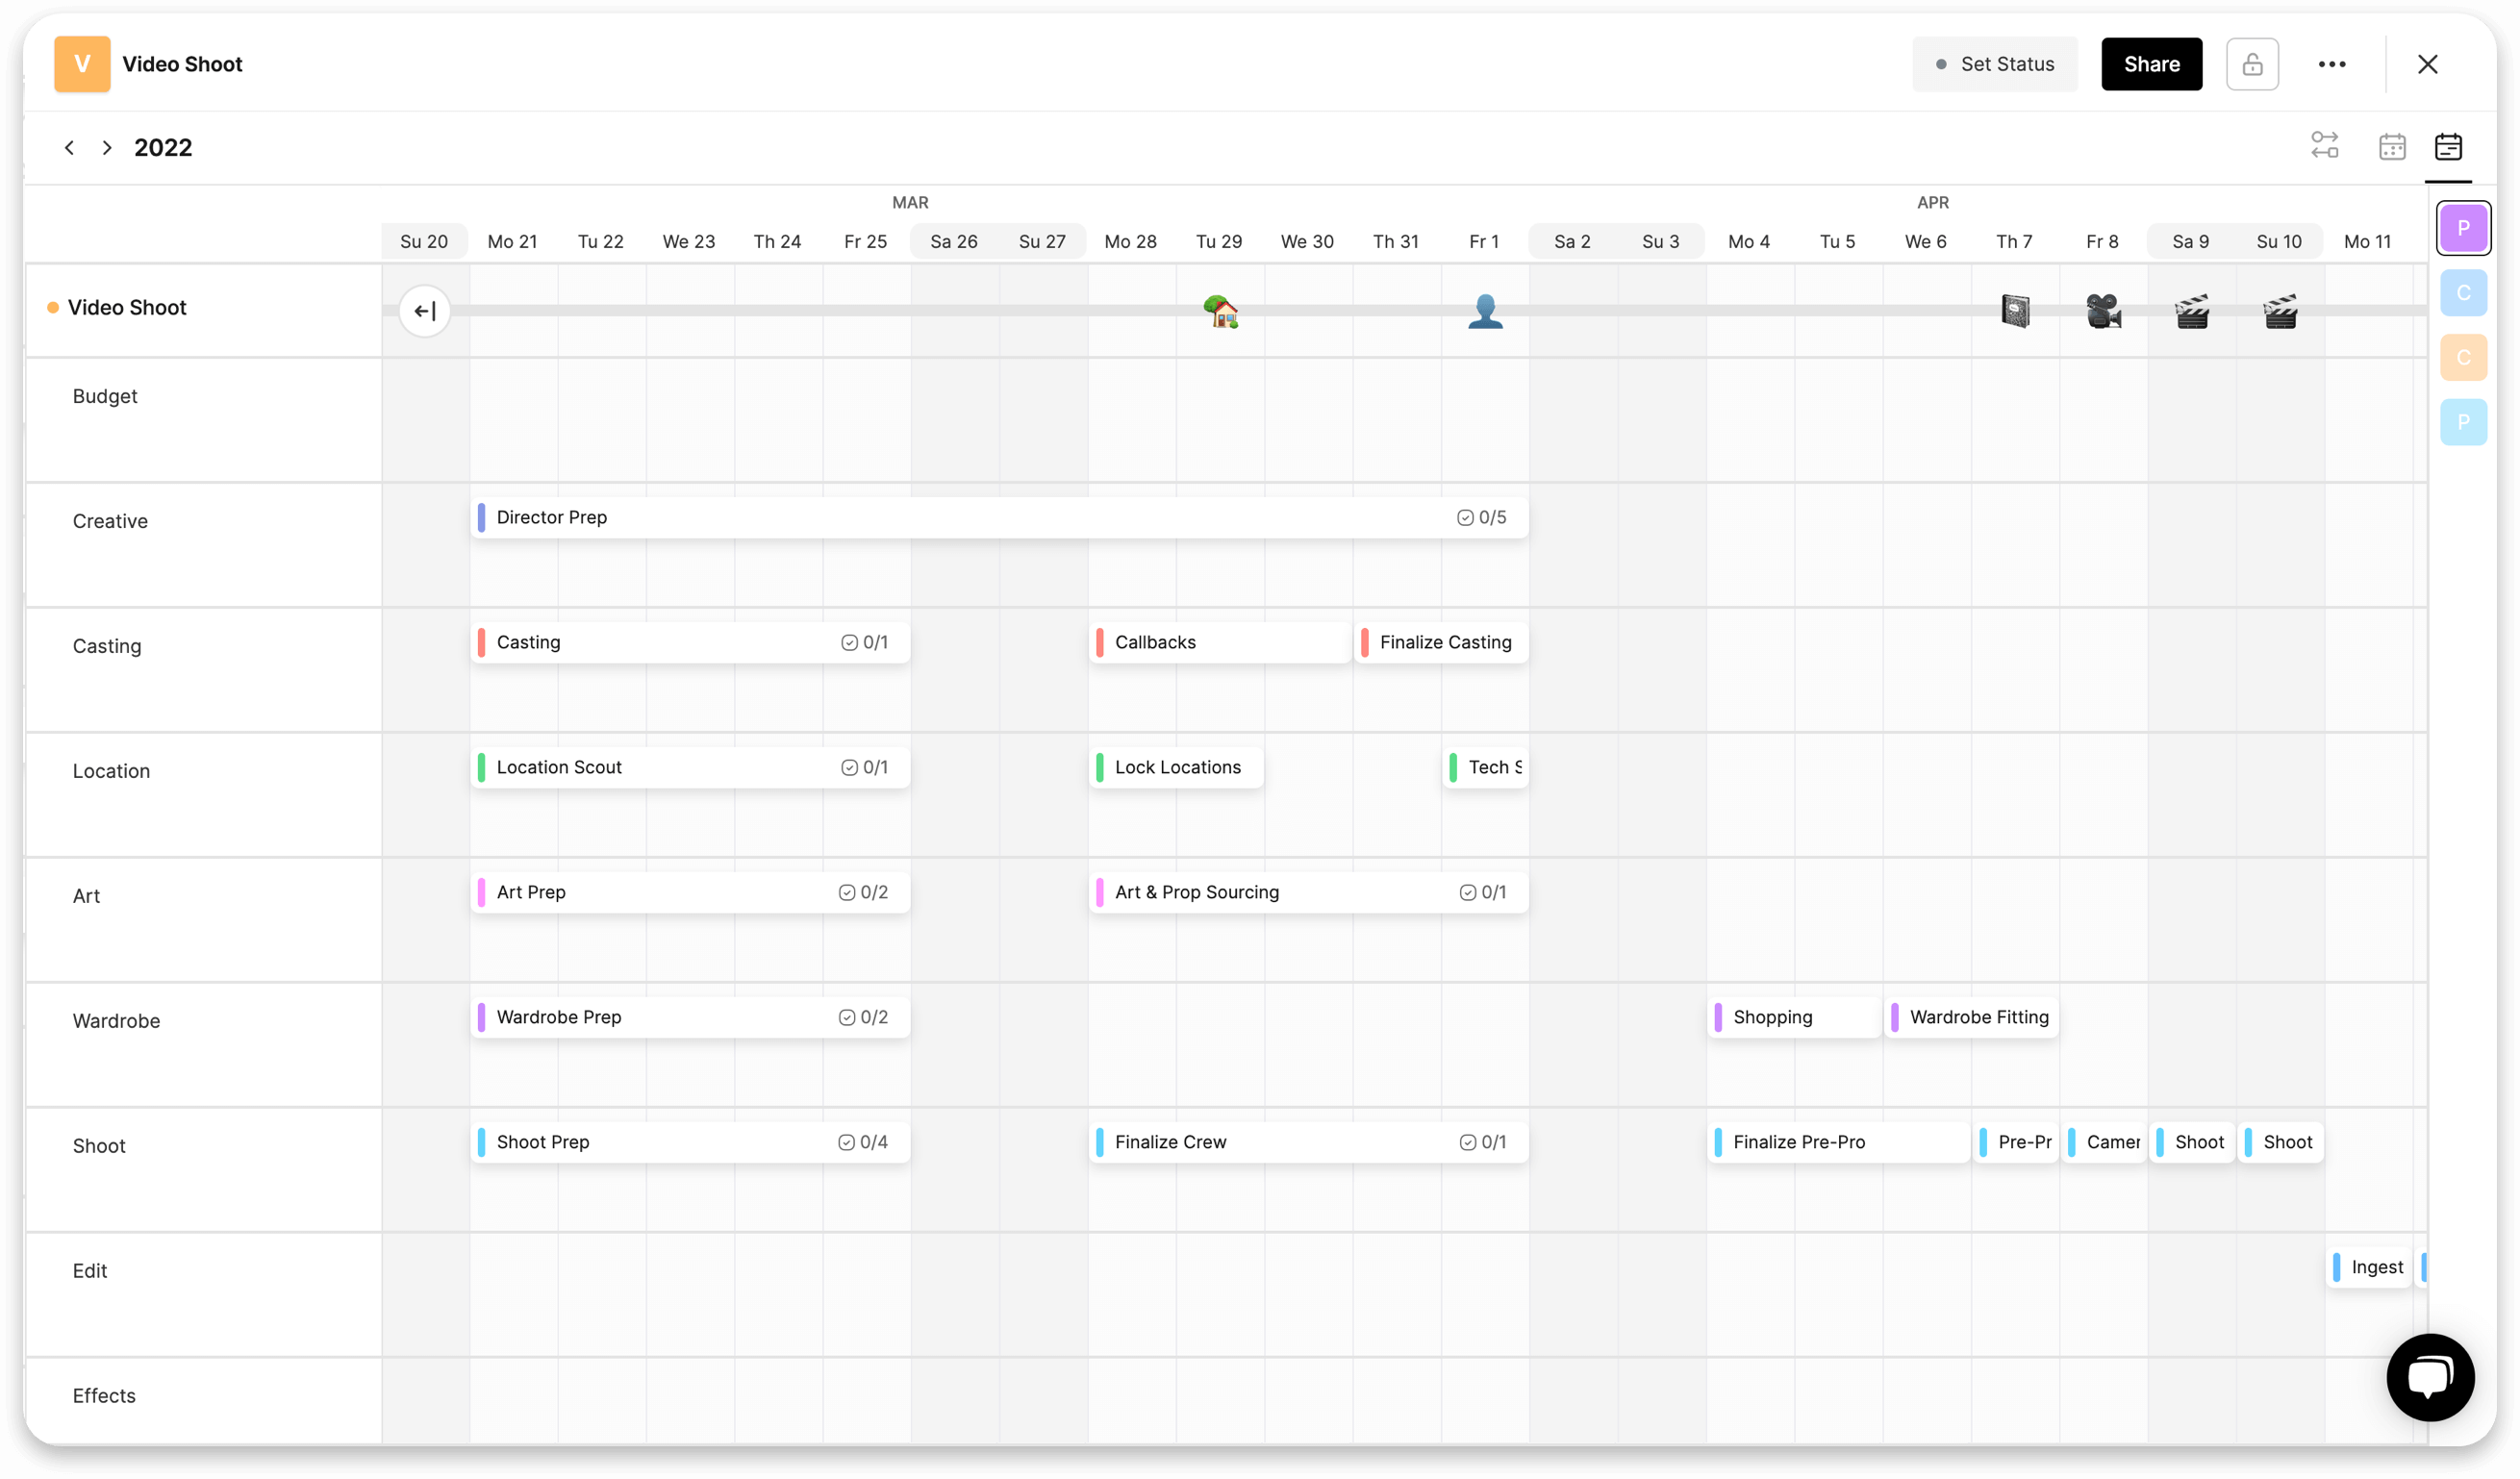
This is also a time when planning and scheduling becomes important. Using software to build a gantt chart can be very useful for visualizing your production phases and timeline. Learn more about how to create a gantt chart in this short video below:
If a production company is contracted, these are some of the common crew positions that would be hired:
-
Director: Creative leader. Works with talent and crew to shoot the production.
-
Director of Photography (DP): In charge of camera, lighting and physically executing the shots.
-
Gaffer: Assists the DP with lighting.
-
Art Director: Responsible for all the non-tech elements of the location (props and set dressing).
-
Hair and Makeup: Prepares the talent to look good on camera.
-
Wardrobe: Coordinates clothing for talent. Often actors will bring several choices to the set and wardrobe will be brought to the director for approval.
-
Sound: Captures all the audio on set, including voice-over.
-
Craft Services / Catering: Craft are the snacks and beverages available to the talent and crew during the shoot. Catering is responsible for the meals.
Storyboarding the Video Production Script
A storyboard is a visual sketch or photo representation of what will be captured within the frame. It can be as basic as a series of stick figures or an incredibly detailed drawing set to scale. You can also take still photos to show the different shots, camera movements and screen direction. The purpose of the storyboard is to have a visual guide to how the video production will cut together. That way everyone on the creative team is working towards the same goal. This becomes your visual shot list and is incredibly valuable as a creative communication tool.
Here is an example of a storyboard using the mock Starbucks script we created.
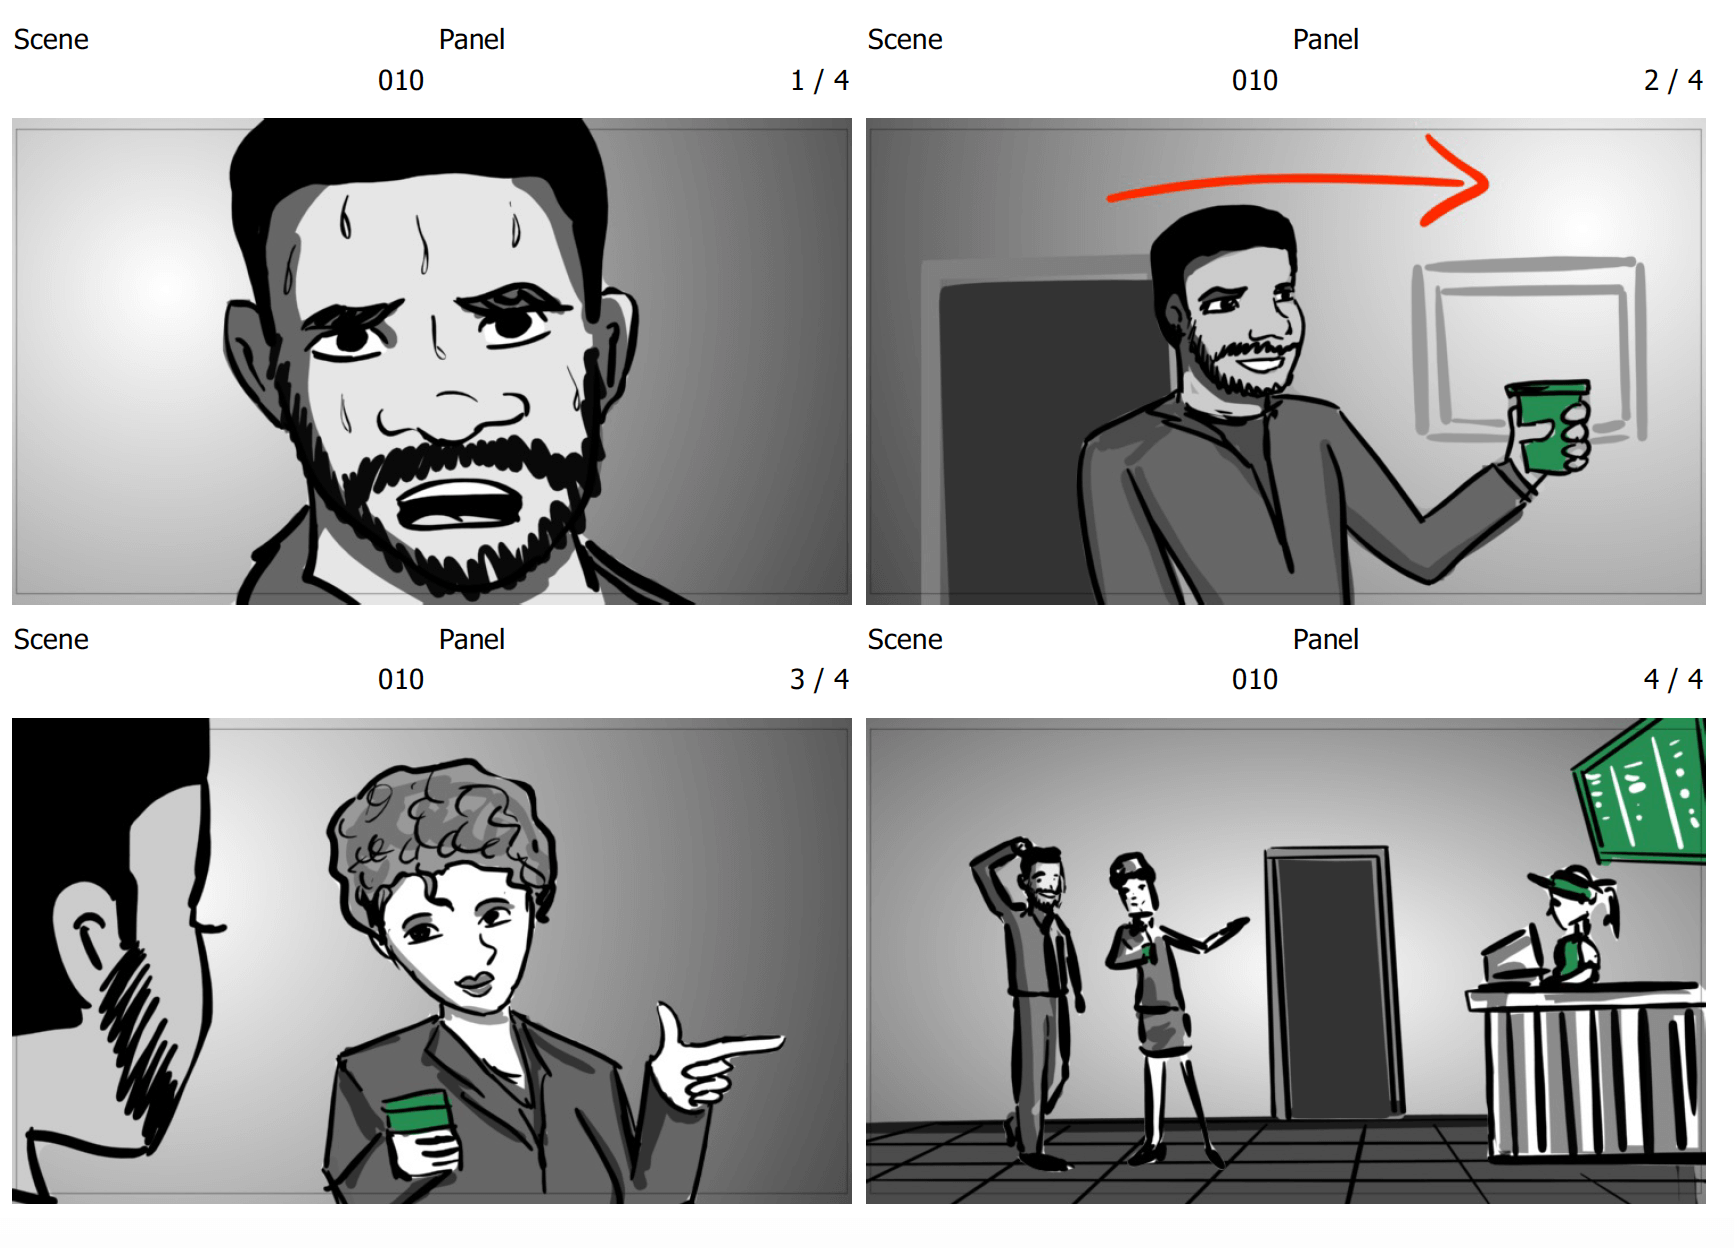
Storyboard Artist: Joseph Castillon
One note, know the aspect ratio of your distribution channel. An aspect ratio is the width and height of a screen. The normal aspect ratio for a video is 16:9. A video with a 16:9 aspect ratio is a wide rectangle. But some distribution platforms show their videos as squares.
Facebook, for example, has a broad range of recommendations based on placement, content and how it will be viewed. Here are their specs:
-
For feed placements: square 1:1 for images and vertical 4:5 for videos.
-
For stories placements: Most people hold their phones vertically so it’s recommended 9:16 to capture the whole screen.
-
For video carousel format: Square 1:1 and consistent ratios for all videos in a carousel.
-
For in-stream video: Horizontal 16:9 to fit the videos the ads are in.
-
Audience Network placements: Vertical 9:16.
Finding Locations for Production
Assuming your video is not an animation, you’ll need to find a suitable location for production. Depending on your concept this could be one location or several locations. The complexity of the search will depend heavily on the type of video being produced. If you are filming an interview or customer testimonial, finding a location should be relatively easy. You could use the person’s home or office.
However, if the video has numerous locations, interior and exterior scenes or highlights a particular type of activity or business, part of the process will be to scout many different possibilities to find the ideal location(s). Here are a few things to consider as you search for the perfect location.
-
Bring a camera along as you tour locations. Photos will give the team a good idea of the space and be helpful in planning the shot list should you decide to book it.
-
Be aware of noise, especially if you are shooting exteriors. Parks and streets can be noisy. Also consider the location of the location. For example, is it near a school where foot traffic might be an issue? Does the space make it difficult to load the video equipment?
-
Keep parking in mind. If the location itself has limited parking for cast and crew, you’ll have to make arrangements nearby or arrange a shuttle.
-
Budget for rental fees and permits. If using a production studio, rates can vary depending on your location and needs. Typically you would rent by the half-day or full-day, as hourly rates tend to be higher. The advantage to a studio is the video production company that owns it often provides amenities and/or offers equipment rentals. Private location fees are what you can negotiate. If you are filming on public property, you should check if obtaining a permit is required.
-
Don’t forget B-roll locations (alternative footage to be intercut with the main footage). For example if you are interviewing a surfing champion, you may want footage of surfers on a public beach as a transition to cuts in the interview. Getting that b-roll footage usually requires a permit if it’s a county beach or permission to film from the owner if it’s privately owned.
-
Are there any weather warnings during your production dates? Especially if you have a planned outdoor shoot, have a backup location should you be faced with a possible change in the weather. This should be considered in the pre-production stage.
Casting Your Video Production
Casting is part of the video process where you audition and choose the actors and extras that will be in front of the camera speaking the lines, doing the actions and effectively delivering the message of the video.
It’s easy to get to this part of the pre-production phase and think you can save money by not hiring professional actors. Don’t do it. An inspired concept turned into a great script is meaningless if you don’t have skilled actors delivering the content. The best way to accomplish this is to hire a casting director. This person will pre-read actors and only bring in those most suited to the roles. The actors may read the script if available or come in with prepared material.
A few tips on casting:
-
Put the auditions on tape. How an actor is in the room might feel different when you view them on camera. This also gives the production team the opportunity to view the tapes later and discuss.
-
Do chemistry reads. If you have more than one principal actor, bring back your top choices to read together. You may love two actors separately, but when they read the copy together it just doesn’t work.
-
Be open minded. Don’t write off an actor because it wasn’t how you envisioned the part in your head. Sometimes an actor will walk in and bring something you didn’t even know you needed to the role.
-
Representation matters. You want the person viewing the content to visualize themselves buying your product or engaging in this world. Consider a range of ages and ethnicities when casting for the broadest appeal.
3. Production
There is now a budget and a plan. A script and a storyboard. Locations have been secured and any permits acquired. Actors have been cast, crew hired and equipment rented as the shoot day looms.
The production phase is when all the elements needed to produce a finished video are captured on camera.
Prepping the Location
Before the director can call action, everything must be in its place. Depending on the scope of the production, the space will work as is or the set must be dressed. To dress a set means to place any props or furniture in the desired location to create the look and feel of what you want. Sometimes dressing a set is not putting new things in place, but striking things that are out of place or look cluttered.
If this is a simple interview and you are not hiring a professional but doing it yourself, we have a few suggestions to get the best result with limited resources.
-
Placement in Location: Take into consideration where you place the subject so that you can take advantage of depth of field and best light. You want to separate the subject from the background when framing and lighting. The best way to achieve that separation is to choose a room with enough depth to bring your subject at least ten feet away from the background.
-
Use Natural light: It gives you an organic look and feel, which for an interview can create a sense of realness. However, depending on the duration of the shoot, be prepared to recreate artificially what you established earlier in the day as the light changes or your video editor will have to attempt to match it in post. Additionally, you may want to supplement it with daylight color balanced light to brighten up shadows.
-
When shooting, turn off the air conditioner and unplug any appliances. Having them run makes it difficult to get clean audio.
Preparing to Shoot
With the script and the storyboards, there shouldn’t be much guess work on what is being captured on camera. All of the planning is converted to a shot list by the director, which maps out the camera movements, exactly what framing and angle will be used to record the scene. Of course once on set, what is theory becomes application and adjustments often are made. Perhaps the two-shot planned didn’t account for the massive height difference between the two leads. In that case, the framing may need to be adjusted or lens swapped to get the shot.
On a larger budget production, the director of photography and gaffer will own or have rented their desired equipment. However, if you are working on a smaller budget and handling the camera, lights and sound yourself, there are affordable options.
Lighting and Sound
LED panels are commonly used in video and photography as a directional light source because they are powerful, consume low energy, and are durable. There are two types, RGB and Bi-color. The Bi-color offers a bright direct light which works well as a key light for video.
Sometimes you won’t want such bright white light directly on a subject. You can diffuse your LED panel light to create different lighting effects. One simple way to diffuse light is to simply increase the distance the light has to travel by moving it further from the subject. You can also place a semi-transparent barrier in front of the light such as fabric, acrylic or even white copy paper.
Aputure is a brand specialized in the production of high-quality lighting for filmmaking. For under $250 you can purchase their Amaran P60x, a bi-color LED panel, which is compact, lightweight and portable and comes with a soft box diffuser.
If you are doing your own sound, a good quality microphone is key. An audience can forgive a moment of soft focus or an oddly framed shot if they are engaged in the storytelling, but if they can’t hear or the sound quality is bad, you’ve lost them. A blurry moment on screen can be an artistic choice, bad sound is just bad sound.
You’ll want to be using either a directional or shotgun microphone or a lavalier microphone (wired or wireless). The directional microphone can either be mounted on your camera or a boom arm. Two excellent brands of directional microphones are Deity and Rode which are relatively affordable and provide very good sound. The lavalier microphone is placed on your subject and is either wired or wireless.
Both the directional microphone and the lavalier can go directly into your camera or to an external audio recorder for later audio sync in post-production. B&H photo has an excellent article on how to use a portable audio recorder on a video shoot.
4. Post-Production
The post production process involves taking all the footage you captured in production and turning it into a final product. This is done by picture editing, sound editing, color grading, VFX (visual effects), as well as adding titles and credits and any voice-over or musical score.
Editorial and Sound
The editing process is the first step in post-production. An editor will have read the script and reviewed all the takes. The shots are then cut together from the raw footage to create the story. The first pass is called a “rough-cut”. Once there is something resembling the story, the producer and director will view and give feedback and the editor will continue to make edits and tweaks until everyone is satisfied.
In sound design, the audio is refined to ensure it sounds its best. The sound editor works with the audio files that correspond to visuals in the edit. placing dialogue and music on the timeline of video editing software. Audio design is not just adding dialogue, music, and voice-overs, it’s also adding all the subtle sound effects such as a rustle of leaves or heels on a pavement that bring a reality to the scene. If any dialogue wasn’t captured cleanly on set, the actor may be brought into the sound booth to record ADR, which is to re-record their voice.
Picture Post Production (Color and Online), VFX and Mix
Color grading is used when you are adjusting for aesthetics and consistency. It allows you to be creative with the look and feel of the images. Color can set the mood the same way that music can to a scene. You are adjusting the exposure, the white balance, the graininess or clarity of the image, the color and the contrast.
Online editing is the process of matching the final offline edit in full high resolution and includes fixing any issues with the picture. It also encompasses titling (main and end credits), captioning and simple visual effects.
If you need to create or manipulate imagery that was not captured live on camera, you would use visual effects, referred to as VFX. Often visual effects are integrated with live-action footage using computer-generated imagery (CGI).
After the video editing, sound mixing, color grading and VFX ( if needed) is completed, it’s time to put it all together in one cohesive mix. When the video is finalized and the producers sign off on its completion, the video is exported and ready for distribution.
5. Distribution and Marketing
Now that you have this amazing video, you need to distribute it for the world to see. Hopefully you started the process knowing how you were going to roll it out as a marketing tool. You can learn more about marketing in our Creatives Offscript podcast episode with Carolyn Tisch Blodgett, former Global Head of Marketing at Peloton. As we mentioned earlier in this article, different platforms require different aspect ratios and you would have taken that into consideration before you went into production. However, publishing doesn’t have to be a singular event. You may have envisioned hosting it as an embedded video on your own website, but you can place your video on multiple platforms.
Do your research on the best social media for your audience. Some webpages are daily destinations with vast audiences. Others are niche sites catering to specific users. Don’t overlook the little guy. Massive outreach and marketing to a demographic not interested in your content is not as valuable as a smaller subset of exactly the people you are trying to reach.
Think creatively. Consider transcribing the video to be an article. Or writing an article based on one key aspect of your video. This way you will be seen on sites that don’t have video and you can link to your video content driving more traffic your way.
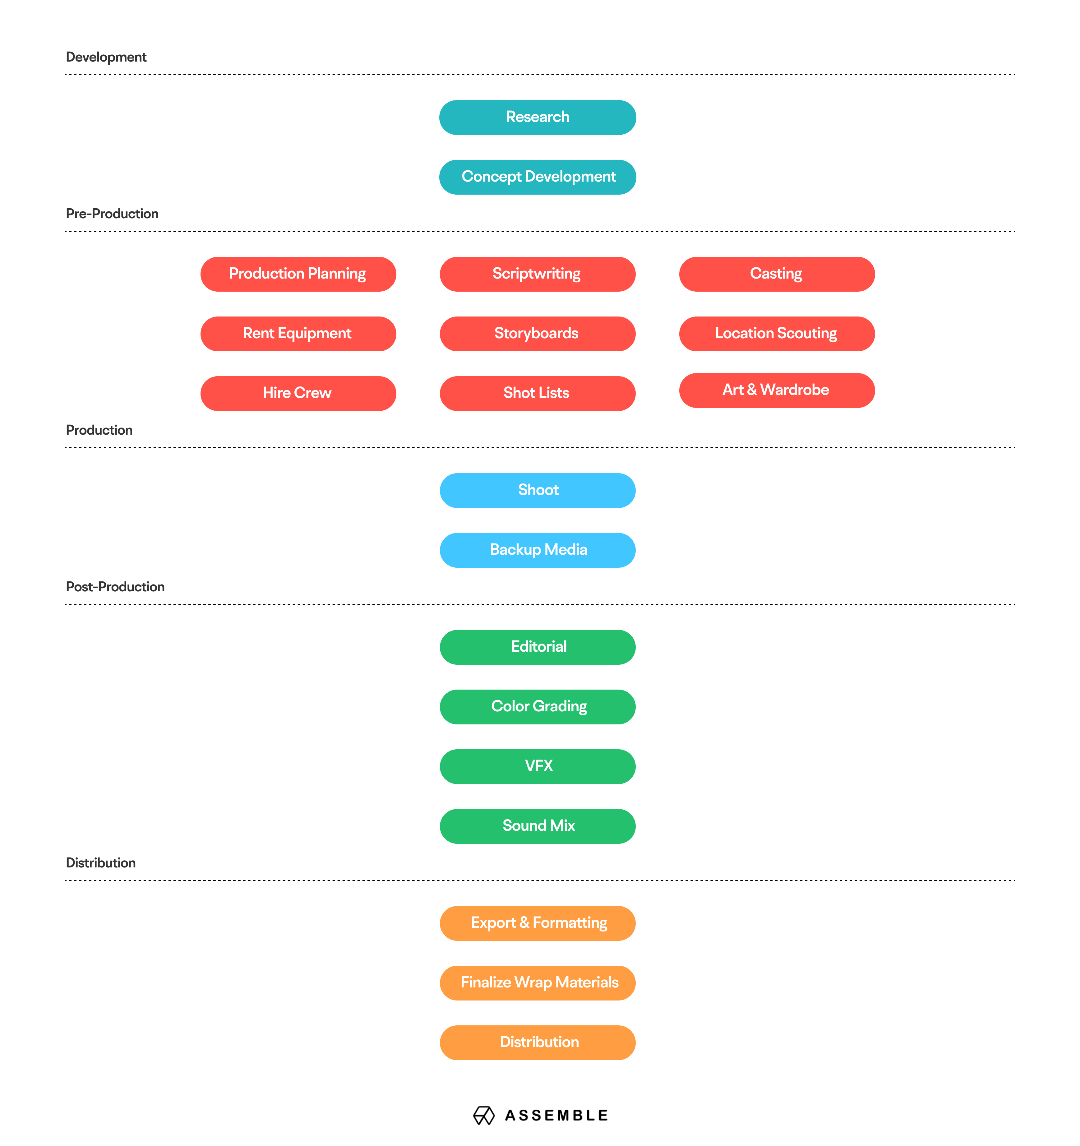
Video Production Process Flow Chart
There is a lot of information to absorb and just as it was valuable to break down the video production stages, having one visual reference that encapsulates all of it can be helpful. This video production process flow chart takes you through the video production steps that makes conceiving and executing your video vision seamless.
Video Production Steps: Summary
The video production steps are:
1. Development: Identify your message, brainstorm your idea and write script.
2. Pre-production: Lock script and plan all elements for production.
3. Production: Capture everything you need on camera.
4. Post-production: Edit footage and mix all sound, color, captions and effects.
5. Distribution: Publish on multiple platforms.
Why are the Individual Video Production Stages Important?
When it comes to the stages of video production, you want to be a fundamentalist. Here are three reasons why:
Preparation combats perspiration
Remember that feeling of walking into a test you didn’t study for in high school? That relatable panic of being unprepared to accomplish your task is not something anyone wants to recreate.
You can’t fix an idea in post
If you start out unclear on your message, don’t develop a solid script and an actionable plan to execute it, you’ll put too much pressure on the post-production process to save your investment.
Teamwork makes the dreamwork
Video production is a collaborative process. What you do or don’t do can affect the important steps integral to the completion of the project. When everyone has the same roadmap, everyone is heading in the right direction.
Key Takeaways of the Video Production Process
If you follow the video production steps which include development, pre-production, production, post-production and distribution and marketing, you are giving yourself the best leg-up to have a successful video.
Be clear on the message you are trying to convey. Spend time researching the best way to reach your audience by the content you devise and your choice of platform to distribute it.
If you are not doing it yourself, hire talented people that can write the best script, capture it creatively on camera and act it out with skill. Make sure you are happy with the edit and revise as necessary. Give yourself options by creating different versions that will be most successful on multiple platforms.
And allow yourself to have fun. Deadlines and outcomes can be stressful, but if you are organized and structured, you have given yourself the best opportunity for success.